Toddler Learning Resource: Colors, Matching, Patterns, & Shapes
I never anticipated creating activities that would give mamas the opportunity to teach their toddlers. However, four years in the classroom followed by the decision to be a stay at home mama has led me here. My hope is to equip mamas with the tools and wisdom they need to teach their toddlers. I know how overwhelming this holy task may seem. It is such an honor to teach our babies, but where and how do we start? My prayer is that these learning resources will empower you. May you feel confident and prepared as you begin to intentionally teach your child!
The activities I have created are simply another tool for mamas to use as they teach their child. Whether you are matching colors in the Toddler Learning Resource or building blocks or going for a walk -- there are opportunities for children to learn all day long. I believe fostering a love for learning is a worthy priority!
My greatest prayer in all of this is that the Lord is glorified. I am so grateful that he's allowing me to use my passions and abilities to create and share these resources with you. While I hope your child learns, more than that, I hope your relationship with your child is strengthened. Enjoy learning with your littles, precious mamas, but most of all, let love lead all of your learning together!
Want to learn more about my Toddler Learning Resource? Let's get started!
You can find my Toddler Learning Resource HERE.
You can browse my Amazon Favorites HERE.
You can read my Disclosure Policy & Terms of Use HERE.
Set-Up
Before I walk you through the resource, let me mention a few things about set-up.
Let's start with printing. I own a color printer, so I print from home. If you don't own a printer, I think it's a great investment! However, always do what is best for your family! If you are looking for a reasonable printing company, I recommend The Homeschool Printing Company or Family Nest Printing.
I chose to laminate most of the pages in this resource. I adore laminated pages because they are sturdy and essentially toddler-proof. If you want your pages to be laminated, I would recommend purchasing a personal laminator and laminating pouches. I do NOT recommend paying a company to laminate this resource because it is typically extremely expensive. However, if you choose to not laminate the resource, that’s a-okay! I'll give some tips and tricks as we chat through the resource!
Supply List
Here is a list of the supplies I needed to set up the Toddler Learning Resource:
A printed copy of my Toddler Learning Resource
Four 1 1/2 inch binders (you may only need 2 or 3 depending on setup)
Scissors and/or paper cutter
Binder ring (optional)
At the bottom of this post, I’ll walk you through exactly what you need!
All About the Resource
Binder Covers
I separated this resource into three 1 1/2 inch binders. Here’s what is in my 3 binders:
Crayon Matching, Circle Matching, Color Sort, Red, Orange, Yellow, Green, Blue
Purple, Pink, Brown, Black, Gray, White
Matching, Patterns, & Shapes
Since I laminate most of the activities, my binders are FULL. However, if you choose to not laminate the pages, you may only need 2 binders, separated like this:
Crayon Matching, Circle Matching, Color Sort, Red, Orange, Yellow, Green, Blue, Purple, Pink, Brown, Black, Gray, White
Matching, Patterns, & Shapes
We also use a 1.5 inch binder as our "learning folder". Each week, I select which activities and topics I want to focus on and move those pages to my child's learning folder. I included several different color options for you to choose from to use as the cover of your child's personal binder. A “learning folder” binder is absolutely optional.

Colors
This is by far the largest section of the resource and includes so many fun activities that you can use over and over again. As I walk you through this resource, I'll give you some tips and tricks on how to make this product last forever!
In the color section, there are two matching activities and a sorting activity. I would suggest laminating these pages. If you don't own a laminator or don't plan on investing in one, I would suggest printing on cardstock paper. For these activities, I recommend using velcro to secure the pieces to your laminated pages. The velcro is a win-win: it keeps all of your pieces organized and kids LOVE it! Another option is to store the pieces in a binder pouch.
Each color included in the packet (Red, Orange, Yellow, Green, Blue, Purple, Pink, Black, White, Gray, and Brown) has 5 pages dedicated to learning that color. While laminating these pages will ensure that they last a really long time, it is NOT necessary. If you aren't interested in laminating everything, my recommendation would be to purchase some dry erase pockets and dry erase markers. This will save you from laminating for hours, but it will also save you from making lots of copies in the future! All you would need to do is print the pages, 3-ring whole punch them (or slip them into a page protector!), and stick them in your binder. When you're ready to use a page with your toddler, just slip the page into the dry erase pouch and use the dry erase marker for writing! Even though my pages are laminated, I actually still put my pages in dry erase pouches (I simply choose to laminate for durability). If you write directly on the lamination, the dry erase markers will often stain the lamination. The dry erase pouches keep my resources in perfect condition!


As you work through these activities with your child, I encourage you to model everything! Your little one is learning how to learn, and it is your role to scaffold their learning. This includes a lot of modeling and guidance.
Also, make these activities your own. Use your own creativity and experiences to extend these activities beyond the worksheet. Maybe go on a scavenger hunt for things that are the color "red" or create a box of different colored objects and sort them out together. There's something to be said about sitting still and learning on paper (well, using dry erase markers because that's more fun!) but there is also something very powerful about hands-on learning!
Color Matching
I highly recommend laminating these pages! After laminating, I whole punch the first page and place it in my binder. Then, I cut out the squares on the second page to use for matching. I use clear velcro dots to secure the matching pieces to the page.

Color Activities
This section requires zero prep. Just print and go! I slip the color activities for each color into a single page protector to keep them all in one place. Therefore, I use 11 page protectors when setting up this section in my binder. You could also just hole-punch the pages and store in the binder.
Here’s a quick look at how you can use these pages:
Dot Pictures
When I first started to teach my oldest child colors, I bought a pack of sticky dots at the dollar store. This was right around the time he became obsessed with stickers. I was amazed at how much fun he had sorting the different colored stickers onto their matching colored paper. So I began to seek out other ways for us to use these sticky dots in our learning.
The dot picture pages are the perfect size for sticky dots. One of my tips to make this activity easier for your toddler is to take off that white sticky backing part of the sticker sheet. You may have no clue what I'm talking about right now, but I assure you, once you look at a sticker sheet, you're going to have a big "duh" moment like I did. Removing that sticky backing allows your toddler to peel off the stickers ALL BY THEMSELVES. Amen.
We also use our handy dot markers with these pages, and my toddlers think it is so much fun!

Color Pictures
We use these pages in so many ways:
Painting with a paint brush
Baggie painting (place the page in a gallon size bag, squeeze in some paint, seal, & let your child spread the paint with his/her hands- so much fun!)
Coloring
Play dough mats
Sorting

Matching
I am a huge advocate for laminating this section. The matching section has been well-loved in our home, which means all the little pieces have been touched a million times. Laminating them ensures that they will last forever! To keep up with all the little matching pieces, I used clear velcro, but you could also use binder pouches. If you choose to not laminate this section, I would definitely print on cardstock paper.
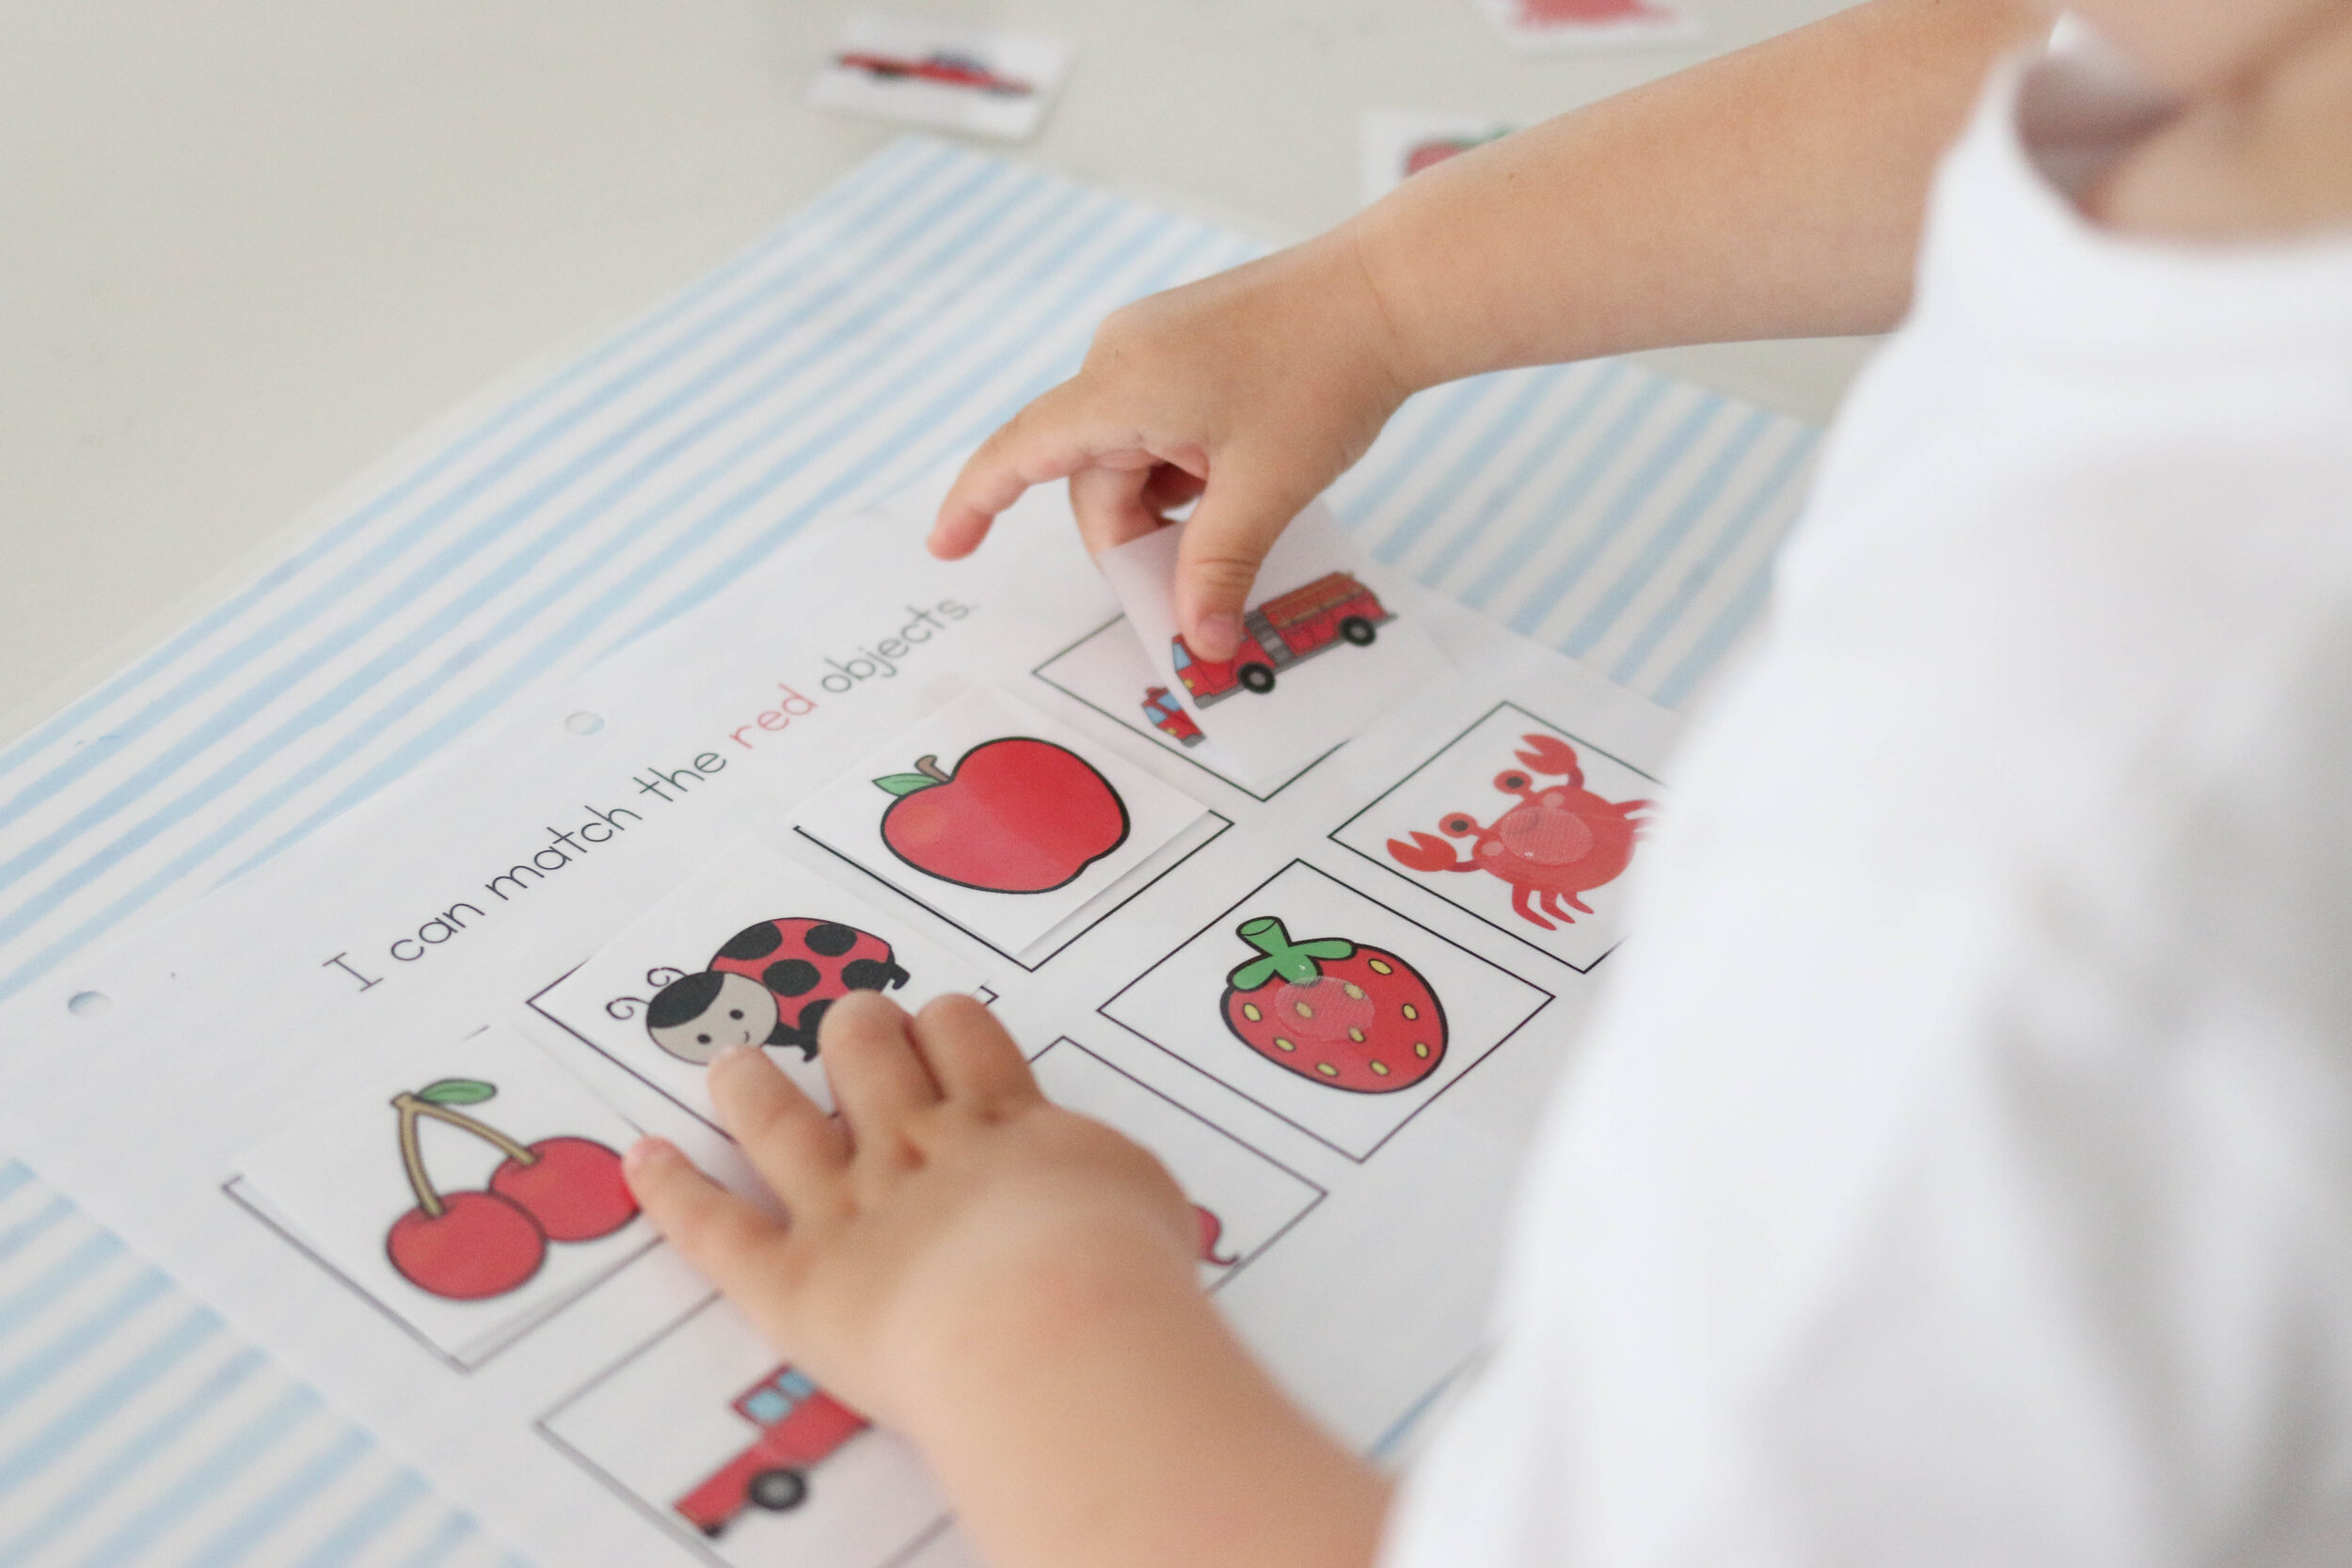
The matching section was created to help expand vocabulary and work on fine motor skills. Is your child ready to learn animal names and sounds? Use the "I can match the farm animals" page and include animal sounds in your teaching! Maybe you're going on a beach trip soon. Use the "I can match the ocean animals" page to talk about the animals that live in the ocean!
If you're just getting started with your young toddler, offer a whole lot of patience, let them move at their own pace, model everything, and give them grace when they throw pieces on the floor! Let love lead your learning together!


Patterns
I guess I should mention the "I can" statements throughout the binder. In this section you will see the statement "I can finish the pattern". Well, the first time your toddler works on this section, that statement may not be true. Could it be true with some modeling? Absolutely! Could it be true after lots and lots of practice? Yes! These "I can" statements give you a goal in your child's learning. My hope is that your toddler will one day be able to confidently proclaim every single "I can" statement in this resource.
I suggest laminating this section.

Shapes
The final section is all about shapes. This resource reviews the following shapes: Circle, Square, Triangle, Rectangle, Star, Oval, Diamond, Arrow, and Heart. In choosing which shapes to include I decided to truly make this toddler friendly. One day, our babies will learn all about a rhombus and a trapezoid, but today just isn't that day. Each shape has 4 pages dedicated to identifying, tracing, and drawing that particular shape. I have also included matching and identification activities.
In regards to set up, I would encourage you to laminate the matching and identification activities. While I laminated all of the individual shape pages, it is not essential! I would recommend using the dry erase pouches and dry erase markers.

Toddler Learning Resource Skills
At the end of this resource, I have included a check-list of skills. This check-list is helpful in recognizing what your toddler already knows and planning the skills to focus on next. However, my greatest desire is for your learning with your toddler to be fun! So, don’t take this check-list too seriously. Simply use it as a guide! Always remember, it’s not about the skills. It’s about these moments of connecting with your child through playful learning!
In Depth Supply List
A printed copy of my Toddler Learning Resource
The Toddler Learning Resource is 260 pages.
If you own a printer, I recommend printing at home. If you don’t own a printer, I highly recommend purchasing one!
You can always print at places like Office Depot & Staples; however, it can be pretty pricey for a document this large. Here are a few other options that I can recommend:
If you’re printing at a print shop, consider taking the time to select which pages you want to print in black & white and which pages you want to print in color. Color copies are typically more expensive than black & white copies.
Three or Four 1 1/2 inch binders (depending on how you set up your resource, you may be able to fit all the Color activities into a single binder)
Binder #1: Crayon Matching, Circle Matching, Color Sort, Red, Orange, Yellow, Green, Blue (cover page: page 8)
Binder #2: Purple, Pink, Brown, Black, Gray, White (cover page: page 8)
Binder #3: Matching, Patterns, & Shapes (cover page: page 2)
Binder #4: Your child’s Learning Folder (cover page: pages 3-7)
Sheet protectors - I used exactly 15 sheet protectors. Here are the pages that I put in sheet protectors. These page numbers coordinate with the PDF.
Color Activities (1 per color to hold all the art pages for each of the 11 colors, pages 101-188)
Matching Cover Page (page 189)
Patterns Cover Page (page 208)
Shapes Cover Page (page 217)
Skills Sheets (pages 259-260)
*OPTIONAL: If you choose not to laminate the following pages, sheet protectors would be a great option:
Pages 22-76 (11 sheet protectors)
Pages 218-256 (10 sheet protectors)
Laminating pouches - I used exactly 157 laminating pouches. It is not necessary to laminate the exact pages that I laminated. Here are the pages I chose to laminate:
Colors (pages 9-76) *You could use sheet protectors or dry erase pouches for pages 22-76
Color Matching (pages 78-99) *I would definitely laminate this section (cardstock if not)
Matching (pages 190-207) *I would definitely laminate this section (cardstock if not)
Patterns (pages 209-216) *I would definitely laminate this section (cardstock if not)
Shapes (pages 218-258) *You could use sheet protectors or dry erase pouches for pages 218-256
Scissors and/or paper cutter
Clear velcro - I used exactly 211 Velcro Dots
Colors (18 dots)
Color Matching (88 dots)
Matching (72 dots)
Patterns (24 dots)
Shapes (9 dots)
Binder ring (optional)
Dry Erase pockets - I do not write directly on the laminated pages with a dry erase marker. It tends to stain. I LOVE these dry erase pockets. I slip all my laminated pages into a dry erase pouch for use!
Extra Notes:
I printed 2 copies of page 8 so that I would have a “Colors” cover for both binders.
The Color Matching (page 77) & Color Activities (page 100) pages are simply dividers within the PDF document. I did not use them in my binders when setting up.
Setting Up The Resource in 5 Easy Steps
Setting up your resource is definitely a labor of love, so I’ve divided the workload into 5 steps. My hope is that you will feel empowered to set-up your resource once the task has been divided up. What if you spent 5 nap times over the next few weeks to set up your own Toddler Learning Resource?
Step 1
1. Place the binder covers in the front of your binder. You’ll have 1 binder labeled as “Toddler Learning Resource” (PDF page 2). This will hold the matching, patterns, and shapes activities. Next, choose a Learning Folder cover for your child. There are a few color options! Finally, label 1-2 binders with the “Colors” binder cover (PDF page 8). I split my color work into 2 binders. However, if you use double sided printing OR choose to not laminate many of the pages, you will only need 1 binder.
2. Laminate PDF pages 9-21. This include Crayon Matching, Color Circle Matching, the Color Sort, and the Flash Cards.
3. Follow the directions on PDF pages 10 & 12 (Crayon Matching & Color Circle Matching). Cut out the pieces then use velcro to secure them to their coordinating matching page. Store these pages in the “Colors” binder.
4. Follow the directions on PDF pages 14-18 (Color Sort). Cut out the sorting pieces then store the pieces in a binder pouch. Store these pages & binder pouch in the “Colors” binder.
5. Follow the directions on PDF page 19 (Flash Cards). You can store the flash cards in the front pocket of your Colors binder.
Step 2
1. Let’s take a took at PDF pages 22-76. These pages include color songs, color charts, and color identification activities. You can either laminate all 55 pages, or you can simply store the pages in your binder (either 3-ring hole punch or store in sheet protectors). In our home, when we use these pages, I slip them into a dry erase pouch to make the reusable. Head over to my story highlight “Toddler Learning Resource” to hear me chat through the options!
2. Skip over the Color Matching pages, we’ll handle those during Step 3!
3. Next, let’s set-up Color Activities (PDF pages 101-188). Each of the 11 colors has 8 activity pages. All you’ll need to do is slip each set of color activities into a page protector. All the red activities will go in one sheet protector, all the orange will go in another sheet protector, and so on. All in all, you’ll use 11 sheet protectors. When you’re ready for your child to use an activity page, just pull it out of the sheet protector! While most of the pages in the resource are reusable, we use these as art pages. I save 2-3 favorites of each color for their school memory box!
Step 3
1. Laminate PDF pages 78-99.
2. Cut out the matching pieces for each color.
3. Use velcro to secure them to their coordinating matching page.
4. Store these pages in the “Colors” binder, behind their respective color.
Step 4
1. Slip the “Matching” cover page into a sheet protect. Place inside the “Toddler Learning Resource” binder.
2. Laminate PDF pages 190-270.
3. Cut out the matching pieces for each activity.
4. Use velcro to secure them to their coordinating matching page.
5. Store these pages in the “Toddler Learning Resource” binder.
Step 5
1. Slip the “Patterns” cover page into a sheet protector. Place inside the “Toddler Learning Resource” binder.
2. Laminate PDF pages 209-216.
3. Cut out the pattern matching pieces (PDF page 215)
4. Use velcro to secure the pieces to complete each pattern.
5. Store the pattern activities in the “Toddler Learning Resource” binder.
6. Slip the “Shapes” cover page into a sheet protector. Place inside the “Toddler Learning Resource” binder.
7. Let’s take a took at PDF pages 218-256. You can either laminate all 39 pages, or you can simply store the pages in your binder (either 3-ring hole punch or store in sheet protectors). In our home, when we use these pages, I slip them into a dry erase pouch to make the reusable. Store these pages in the “Toddler Learning Resource” binder.
8. Finally, laminate PDF pages 257 & 258. Cut out the matching shape pieces and secure with velcro. Store this matching activity in the “Toddler Learning Resource” binder.
I hope you and your toddler enjoy this resource as much as we do! I would love for you to rate it on Teachers Pay Teachers! Feel free to send me a DM through Instagram @francieoutlaw or an email to heyfrancieoutlaw@gmail.com if you have any questions. Happy teaching and happy learning!